I love corn and black beans together. They are an eye-catching combination, and when you add some colorful tomatoes and avocados, you have a fiesta on your plate! I have made many variations of this recipe over the years. I love adding some finely diced red onion or fresh cilantro. This is a frugal, simple side dish that's perfect for potlucks since it can be served at room temperature. It also tastes good in an omelette. Obviously corn and beans are not paleo, but they are naturally gluten free so I have no problem eating this as a treat during the summer.
Ingredients:
2 ears fresh corn, boiled or grilled, kernels cut off
2 cups cooked black beans
1 cup diced tomatoes (I used cherry)
1 avocado, diced
Dressing ingredients:
1/4 cup olive oil (I used regular, not extra virgin, because it has a milder taste)
1 TBSP lime juice
1/2 tsp cumin
1 tsp salt
1 tsp minced garlic
Gently combine corn, black beans, tomatoes, avocados. Whisk dressing ingredients together. Drizzle dressing over corn and bean mixture. Stir gently. Adjust seasonings to taste. Serve chilled or room temperature.

Tales of a good girl gone rural.
Showing posts with label prairie food. Show all posts
Showing posts with label prairie food. Show all posts
July 7, 2012


July 6, 2012
July Pantry Challenge is On!
Hey folks, I am back! I have been too busy living life to write about it. But I decided to do a Pantry Challenge with Jessica from Good Cheap Eats, and I thought I'd document my progress here. I started keeping track of my spending two months ago, and I was shocked at how much I spend. Since we don't have to buy meat and eggs, it should not be that high. If you want an idea of how much we spent, go find the USDA chart that shows the average amounts spent on food. We are a family of 4, with 2 little kids, and we spent more than the "liberal" plan. That's without buying beef and eggs. Yikes!
There are several reasons I believe we spent so much. First, I had gotten in the mindset that I needed to buy as much as I could because I never knew when I would be able to get to town. However, looking at the dates on my receipts, I have spent money on groceries every week for the past two months, between having people pick up stuff for me and running into town myself. So, I really don't need to stockpile every time I'm at the store! Second, my husband likes brand name items. He thinks most generic items aren't as good as the brand-names. That's just something we're going to have to work on over time I guess. Third, I don't plan my grocery trips around the sales. I go to the store whenever I'm in town, so if I need (or want, let's be honest here) something, I just buy it. Since I'm usually in a hurry to be done and I've got the kids with me, I don't do a lot of price comparison. That's something I am actively trying to change. Fourth, I don't use coupons. But now I know how to load the online coupons on my Safeway card, so I can take the 5 minutes before going to town to do it! Finally, I have been eating Paleo on and off for the past few months, which usually makes your grocery bill go up. Wheat is super cheap, but fresh produce, especially in our area, is pricier. My solution for that is to pay more attention to what's on sale, what's in season, and buy more frozen veggies. My hubby and kids still eat "regular" food, so you'll still see plenty of non-Paleo items in our menu plans. I do plan to eat up the beans in our pantry, and fresh corn since it's only in season a little while.
My goal with this pantry challenge is to save as much money as possible, by spending as little as possible. I am sure we will buy milk, some fresh produce (since it is July!), and possibly paper towels, but that's it for me. I am not setting any limits on my husband's spending, since he only goes to the store about once every two months and he mainly buys treats for himself. I am also looking forward to getting rid of some pantry items that have languished far too long. I don't think I'll have to get too creative since we have such a large stockpile already.
What we've spent so far:
I asked my parents to pick up diapers, 4 gallons of milk, and fresh produce for me. Those along with a couple other extras were about $85 (spread out over two trips). The good news is we are stocked with diapers for a couple of months! Then my dad gave me a $10 register coupon for Safeway. I bought 10 lbs of potatoes, 2 small bags of chocolate chips, and 6 ears of corn. I paid $.16! That was such a thrill! Then, my hubby spent $60 on bananas, sour cream, cottage cheese, prepared orange juice, two packs of bacon (it was a pretty good price so I was okay with it), and a huge pack of sausage links, which I divided into smaller bags and froze. So, we have already spent about $125, but I think we should be good for the rest of the month.
Here's what we've been eating:
July 1: leftover shepherd's pie (used canned green beans and asparagus from the pantry); don't remember lunch
July 2: had company over and served hamburgers, Texas Caviar (using up black beans from the pantry), fried potatoes, Paleo Cobbler (used peaches from the freezer instead of berries!); don't remember lunch
July 3: both meals in town with family
July 4: lunch: family get-together in town; dinner: Hamburgers, leftover Texas Caviar
July 5: lunch: leftover shepherd's pie for hubby, leftover hamburger and sauteed bok choy for me; dinner: steaks, corn on the cob, fresh Texas Caviar with extended family visiting
Breakfast ideas:
I always serve some kind of protein, usually bacon and eggs, sometimes leftover steak or even pork chops. After reading Nina Plank's Real Food for Mother and Child, I have come to believe eggs are almost the perfect human food (unless you have allergies of course).
- potato patties
- hash browns
- bacon, egg sandwiches on bagels
- breakfast burritos
- scrambled eggs with salsa and frozen veggies (this is what I eat every day)
- pancakes from a mix (hubby's request)
- biscuits and sausage gravy (hubby's request)
- oatmeal chocolate chip muffins
- Coconut Flour Apple Cinnamon Muffins
I promise to post at least once a week as our challenge continues. You can find more great info about the July Pantry Challenge at Good Cheap Eats. You can check out this post from Denver Bargains for tips on eating from your pantry. Also, visit The Haven of Home and scroll down to the bottom of the page to read about her Pantry Challenge from the beginning. I found it really interesting!
There are several reasons I believe we spent so much. First, I had gotten in the mindset that I needed to buy as much as I could because I never knew when I would be able to get to town. However, looking at the dates on my receipts, I have spent money on groceries every week for the past two months, between having people pick up stuff for me and running into town myself. So, I really don't need to stockpile every time I'm at the store! Second, my husband likes brand name items. He thinks most generic items aren't as good as the brand-names. That's just something we're going to have to work on over time I guess. Third, I don't plan my grocery trips around the sales. I go to the store whenever I'm in town, so if I need (or want, let's be honest here) something, I just buy it. Since I'm usually in a hurry to be done and I've got the kids with me, I don't do a lot of price comparison. That's something I am actively trying to change. Fourth, I don't use coupons. But now I know how to load the online coupons on my Safeway card, so I can take the 5 minutes before going to town to do it! Finally, I have been eating Paleo on and off for the past few months, which usually makes your grocery bill go up. Wheat is super cheap, but fresh produce, especially in our area, is pricier. My solution for that is to pay more attention to what's on sale, what's in season, and buy more frozen veggies. My hubby and kids still eat "regular" food, so you'll still see plenty of non-Paleo items in our menu plans. I do plan to eat up the beans in our pantry, and fresh corn since it's only in season a little while.
My goal with this pantry challenge is to save as much money as possible, by spending as little as possible. I am sure we will buy milk, some fresh produce (since it is July!), and possibly paper towels, but that's it for me. I am not setting any limits on my husband's spending, since he only goes to the store about once every two months and he mainly buys treats for himself. I am also looking forward to getting rid of some pantry items that have languished far too long. I don't think I'll have to get too creative since we have such a large stockpile already.
What we've spent so far:
I asked my parents to pick up diapers, 4 gallons of milk, and fresh produce for me. Those along with a couple other extras were about $85 (spread out over two trips). The good news is we are stocked with diapers for a couple of months! Then my dad gave me a $10 register coupon for Safeway. I bought 10 lbs of potatoes, 2 small bags of chocolate chips, and 6 ears of corn. I paid $.16! That was such a thrill! Then, my hubby spent $60 on bananas, sour cream, cottage cheese, prepared orange juice, two packs of bacon (it was a pretty good price so I was okay with it), and a huge pack of sausage links, which I divided into smaller bags and froze. So, we have already spent about $125, but I think we should be good for the rest of the month.
Here's what we've been eating:
July 1: leftover shepherd's pie (used canned green beans and asparagus from the pantry); don't remember lunch
July 2: had company over and served hamburgers, Texas Caviar (using up black beans from the pantry), fried potatoes, Paleo Cobbler (used peaches from the freezer instead of berries!); don't remember lunch
July 3: both meals in town with family
July 4: lunch: family get-together in town; dinner: Hamburgers, leftover Texas Caviar
July 5: lunch: leftover shepherd's pie for hubby, leftover hamburger and sauteed bok choy for me; dinner: steaks, corn on the cob, fresh Texas Caviar with extended family visiting
Breakfast ideas:
I always serve some kind of protein, usually bacon and eggs, sometimes leftover steak or even pork chops. After reading Nina Plank's Real Food for Mother and Child, I have come to believe eggs are almost the perfect human food (unless you have allergies of course).
- potato patties
- hash browns
- bacon, egg sandwiches on bagels
- breakfast burritos
- scrambled eggs with salsa and frozen veggies (this is what I eat every day)
- pancakes from a mix (hubby's request)
- biscuits and sausage gravy (hubby's request)
- oatmeal chocolate chip muffins
- Coconut Flour Apple Cinnamon Muffins
I promise to post at least once a week as our challenge continues. You can find more great info about the July Pantry Challenge at Good Cheap Eats. You can check out this post from Denver Bargains for tips on eating from your pantry. Also, visit The Haven of Home and scroll down to the bottom of the page to read about her Pantry Challenge from the beginning. I found it really interesting!
September 11, 2011
Got a Picky Eater? Never Give Up!
When I first began learning to cook, I made a dish of orzo with diced red bell peppers and zucchini. My future husband looked at his plate with absolute horror. He claimed to despise bell peppers, zucchini, and anything even remotely resembling rice. Since that incident 6 years ago, I have rarely served any of those 3 items. But this summer I've been on a low-carb kick. And I happen to have lots and lots of zucchini in my garden. I noticed this recipe for Cheeseburger Zucchini Boats on Heavenly Homemakers awhile ago, but figured I could never serve it to my husband. Surely he would turn up his nose at it. Surely he would complain the house smelled funny because I was cooking something "wierd".
However, going low carb (or should I say no carb?) can get really boring. I was making the same dishes twice a week. And the fastest way for me to get bored with my healthy food is to eat the same thing over and over. So one night, when we had some leftovers that I knew my husband would eat, I decided to try making the Cheeseburger Zucchini Boats for my kids and myself. They were quick to throw together, and I let them sit in the oven on low heat while I put the baby to bed. When the boys were on their way home, I cut out some triangles and taped them to toothpicks to make 'sails' and stuck them in the 'boats'. My husband walked in and smiled. He was really hungry and ate 1 1/2 zucchini boats without complaint. In fact, he said "they were not bad."
"So," I said, "could you stand eating these once a year?"
"No, these are good!" he said.
Wow!! I was giddy!
The next day, he requested a leftover boat for his lunch. And then the next day he did it again! My husband, a self proclaimed hater of zucchini, actually wanted to eat a dish based entirely on zucchini!
I have seen him do this with other foods too- fresh pineapple and sauteed broccoli, for example. Maybe it's because nobody ever properly prepared these foods in an appealing way. Maybe he wasn't exposed to them enough. Maybe he just needed to pretend his food was a sailboat! Who knows? The point is, when it comes to serving food to your picky spouse, you have to get creative and don't give up! Now, I don't expect him to ever love rice, but maybe someday he will ask me to cook some butternut squash. I think I could carve it into the shape of a boat....
However, going low carb (or should I say no carb?) can get really boring. I was making the same dishes twice a week. And the fastest way for me to get bored with my healthy food is to eat the same thing over and over. So one night, when we had some leftovers that I knew my husband would eat, I decided to try making the Cheeseburger Zucchini Boats for my kids and myself. They were quick to throw together, and I let them sit in the oven on low heat while I put the baby to bed. When the boys were on their way home, I cut out some triangles and taped them to toothpicks to make 'sails' and stuck them in the 'boats'. My husband walked in and smiled. He was really hungry and ate 1 1/2 zucchini boats without complaint. In fact, he said "they were not bad."
"So," I said, "could you stand eating these once a year?"
"No, these are good!" he said.
Wow!! I was giddy!
The next day, he requested a leftover boat for his lunch. And then the next day he did it again! My husband, a self proclaimed hater of zucchini, actually wanted to eat a dish based entirely on zucchini!
I have seen him do this with other foods too- fresh pineapple and sauteed broccoli, for example. Maybe it's because nobody ever properly prepared these foods in an appealing way. Maybe he wasn't exposed to them enough. Maybe he just needed to pretend his food was a sailboat! Who knows? The point is, when it comes to serving food to your picky spouse, you have to get creative and don't give up! Now, I don't expect him to ever love rice, but maybe someday he will ask me to cook some butternut squash. I think I could carve it into the shape of a boat....
July 12, 2011
What To Do with All That Zucchini
It's that time of year! Gardens overflow with that beautiful green squash. I have at least two zucchini plants, which is already one too many, and I may have two more. Last year I didn't have any zucchini and I actually missed it. This summer I'm excited about making the most of my zucchini! I've compiled a list of recipes here that go beyond the usual 'zucchini bread', and I'm determined to try every new one! I'll continue to update this page as I find more recipes.
Tried and loved:
Chocolate Zucchini Bread (All Recipes)
Sausage Zucchini Bake (Kitchen Stewardship)
Zucchini Basil Lasagna (Cooking Light)
Can't wait to try:
Cheeseburger Zucchini Boats
Cinnamon Frosted Zucchini Bars (Shugary Sweets)
Zucchini Cakes (Pioneer Woman)
Zucchini Crisp (Joy in My Kitchen)
Zucchini and Goat Cheese Crustless Quiche (Food Network)
Zucchini Parmesan (Joy in My Kitchen)
What else can you do with zucchini? You can slice it up and grill it, you can grate it and freeze it to make zucchini bread in the winter, you can saute it in olive oil with some garlic, and you can dehydrate it and throw it into winter soups.
How do you like to use zucchini?
Tried and loved:
Chocolate Zucchini Bread (All Recipes)
Sausage Zucchini Bake (Kitchen Stewardship)
Zucchini Basil Lasagna (Cooking Light)
Can't wait to try:
Cheeseburger Zucchini Boats
Cinnamon Frosted Zucchini Bars (Shugary Sweets)
Zucchini Cakes (Pioneer Woman)
Zucchini Crisp (Joy in My Kitchen)
Zucchini and Goat Cheese Crustless Quiche (Food Network)
Zucchini Parmesan (Joy in My Kitchen)
What else can you do with zucchini? You can slice it up and grill it, you can grate it and freeze it to make zucchini bread in the winter, you can saute it in olive oil with some garlic, and you can dehydrate it and throw it into winter soups.
How do you like to use zucchini?
June 22, 2011
Sun Tea

A refreshing alternative to ice water is iced tea. But who wants to heat up the kitchen even a little bit by boiling water? Instead, use the natural power of the sun! All you need are a clear glass pitcher or jar with a lid, water, and a couple of iced teabags. Fill your pitcher or jar with cool water (I even put ice in to fill it up faster). Then pop the teabags into the water. My tea directions say to use 8 glasses of water with 2 teabags, but I don't measure. If the tea comes out too strong, you can dilute it with more water. Put the lid on the container and set it outside in a sunny spot for several hours. I like to set it out in the morning and it's ready by lunch. To serve, fill a cup with ice, then pour the tea over that. Store it in the fridge.
Hints:
You should use a glass container so the BPA from plastic doesn't leach into your tea. But I used a plastic pitcher, because I don't have a glass container that's big enough. Shhhh, don't tell my Real Foodie blogging friends...
You really do need a lid for your container so you don't get bugs in your tea. Unless you think you need the extra protein.
March 7, 2011
Make-Ahead Breakfast Ideas
I am always looking for recipes that can be made ahead (or at least part of them can). My family enjoys a hot breakfast in the morning, and I enjoy the nutritional advantage over boxed breakfast cereal (in fact, I can't remember the last time we ate cereal for breakfast as a family). Here's how I do breakfast ahead of time:
1) Freezer Breakfast Burritos
For each burrito, I use 1-2 slices of cooked bacon, 2 scrambled eggs, shredded colby jack cheese (probably 1/4- 1/2 cup), and 1 flour tortilla (or use your own healthier homemade Soaked Tortillas).
Directions:
Line a cookie sheet with parchment paper. Lay out bacon on cookie sheet. Layer eggs and cheese on top of bacon (as if you were laying them inside a tortilla). Freeze about 15-30 minutes. Place frozen bacon mixture in the middle of tortilla. Roll up. Wrap well in aluminum foil. Label and freeze. When ready to eat, bake at 350 for 35-45 minutes. Unwrap and enjoy a hot breakfast burrito!
2) Mix up dry components the night before.
I make a German Apple Pancake on Christmas morning. The night before, I mix up all the dry ingredients in a tupperware container. I even slice up the apples and put lemon juice on them, and store in the fridge. I set my skillet on the stove and put my stand mixer on the counter (I use it to whip up the eggs). Then in the morning I only need a few minutes for prep time, and I can enjoy a relaxing Christmas morning with my family! The same thing goes for biscuits, pancakes, waffles, and muffins- you can easily mix up the dry ingredients the night before...
3) If you follow a Nourishing Traditions style diet, you should be soaking your grains. I've found soaked pancakes and oatmeal to be the easiest. For soaked oatmeal, just mix your oats, acid medium (1 Tbsp whey, lemon juice, or vinegar) and water in the pot you'll be cooking them, cover with a clean cloth, and leave on the stove overnight. In the morning, cook as usual.
5) Breakfast Strata- Most strata recipes need to be assembled the night before and baked in the morning. My favorite recipe is adapted from Cooking Light's Goat Cheese, Artichoke, and Smoked Ham Strata. I make it with whole milk and eggs, double the ham, and use feta instead of goat cheese.
How do you make breakfast ahead of time?
1) Freezer Breakfast Burritos
For each burrito, I use 1-2 slices of cooked bacon, 2 scrambled eggs, shredded colby jack cheese (probably 1/4- 1/2 cup), and 1 flour tortilla (or use your own healthier homemade Soaked Tortillas).
Directions:
Line a cookie sheet with parchment paper. Lay out bacon on cookie sheet. Layer eggs and cheese on top of bacon (as if you were laying them inside a tortilla). Freeze about 15-30 minutes. Place frozen bacon mixture in the middle of tortilla. Roll up. Wrap well in aluminum foil. Label and freeze. When ready to eat, bake at 350 for 35-45 minutes. Unwrap and enjoy a hot breakfast burrito!
2) Mix up dry components the night before.
I make a German Apple Pancake on Christmas morning. The night before, I mix up all the dry ingredients in a tupperware container. I even slice up the apples and put lemon juice on them, and store in the fridge. I set my skillet on the stove and put my stand mixer on the counter (I use it to whip up the eggs). Then in the morning I only need a few minutes for prep time, and I can enjoy a relaxing Christmas morning with my family! The same thing goes for biscuits, pancakes, waffles, and muffins- you can easily mix up the dry ingredients the night before...
3) If you follow a Nourishing Traditions style diet, you should be soaking your grains. I've found soaked pancakes and oatmeal to be the easiest. For soaked oatmeal, just mix your oats, acid medium (1 Tbsp whey, lemon juice, or vinegar) and water in the pot you'll be cooking them, cover with a clean cloth, and leave on the stove overnight. In the morning, cook as usual.
4) Make a double batch of waffles or muffins and freeze them. They are best reheated in the oven or toaster oven. The microwave tends to make them mushy.
 |
| These Oatmeal Chocolate Chip Muffins can be frozen and reheated in the oven. |
5) Breakfast Strata- Most strata recipes need to be assembled the night before and baked in the morning. My favorite recipe is adapted from Cooking Light's Goat Cheese, Artichoke, and Smoked Ham Strata. I make it with whole milk and eggs, double the ham, and use feta instead of goat cheese.
How do you make breakfast ahead of time?
Linked to Tasty Tuesday.
December 28, 2010
Crisp Cauliflower Salad
Here is a delicious way to serve cauliflower. It is my uncle's recipe. He created it after tasting something similar at Whole Foods. It's an excellent side dish to bring to potlucks, since it doesn't need to be refrigerated. Use as much or as little dressing as you like. Be sure to use plenty of salt. If you don't eat soy, just omit it and use more sea salt.

Crisp Cauliflower Salad
serves 8
2 heads fresh cauliflower
1 bunch of dill, chopped
1 bunch of cilantro, chopped
1 red onion, finely chopped
12 oz frozen peas
crushed red peppers (optional)
4-8 TBSP Italian dressing
1 TBSP soy sauce (optional)
2 tsp sea salt or Tony Chachere's seasoning
1. Preheat oven to 450 degrees. Place whole cauliflower heads in baking pan with 1 inch water. Roast at 450 for 30 minutes.
2. Place frozen peas in small saucepan with 1 inch water. Bring to a boil and shut off stove.
3. Once cauliflower is cool enough to handle, cut into bite-sized pieces. It's best to leave a little core on each piece.
4. Combine crushed red peppers (if using), dressing, soy sauce, and sea salt or Tony Chachere's seasoning.
5. In a large bowl combine vegetables and herbs. Pour dressing mixture over all. Toss to coat.
6. Chill and serve.
Linked to Tempt My Tummy Tuesday, Tasty Tuesday and Ultimate Recipe Swap.

Crisp Cauliflower Salad
serves 8
2 heads fresh cauliflower
1 bunch of dill, chopped
1 bunch of cilantro, chopped
1 red onion, finely chopped
12 oz frozen peas
crushed red peppers (optional)
4-8 TBSP Italian dressing
1 TBSP soy sauce (optional)
2 tsp sea salt or Tony Chachere's seasoning
1. Preheat oven to 450 degrees. Place whole cauliflower heads in baking pan with 1 inch water. Roast at 450 for 30 minutes.
2. Place frozen peas in small saucepan with 1 inch water. Bring to a boil and shut off stove.
3. Once cauliflower is cool enough to handle, cut into bite-sized pieces. It's best to leave a little core on each piece.
4. Combine crushed red peppers (if using), dressing, soy sauce, and sea salt or Tony Chachere's seasoning.
5. In a large bowl combine vegetables and herbs. Pour dressing mixture over all. Toss to coat.
6. Chill and serve.
Linked to Tempt My Tummy Tuesday, Tasty Tuesday and Ultimate Recipe Swap.
December 26, 2010
Meal Plan Dec 26- Jan 1
I hope you all had a wonderful Christmas. Another short week of cooking for me, since I'm taking the kids to town for the weekend. Here's what we eating this week.
Dec 26- Beef Lasagna, fresh pears
Dec 27- Chicken Noodle Soup with Homemade Noodles, peas, carrots
Dec. 28- Pan- Fried Walleye, Fried Potatoes Sauteed Broccoli
Dec. 29- Pork Chops, Creamed Corn, Asparagus
Dec. 30- Chicken Parmesan, noodles, green salad
Dec. 31- dinner in town
Jan 1- Happy New Year! Dinner in town
Be sure to check out I'm an Organizing Junkie for more meal plans.
Dec 26- Beef Lasagna, fresh pears
Dec 27- Chicken Noodle Soup with Homemade Noodles, peas, carrots
Dec. 28- Pan- Fried Walleye, Fried Potatoes Sauteed Broccoli
Dec. 29- Pork Chops, Creamed Corn, Asparagus
Dec. 30- Chicken Parmesan, noodles, green salad
Dec. 31- dinner in town
Jan 1- Happy New Year! Dinner in town
Be sure to check out I'm an Organizing Junkie for more meal plans.
December 13, 2010
Pear Cranberry Pie with Oatmeal Streusel
No meal plan for you this week. I'm still trying to get back in my rhythm after our trip. But here's a lovely seasonal pie that tastes as good as it looks. I found this recipe in Cooking Light a few years ago. It is easily adaptable to Real Food ingredients. The streusel topping has no nuts, which I appreciate.

Pear Cranberry Pie with Oatmeal Streusel
adapted from Cooking Light Magazine, November 2007
Topping:
3/4 cup regular oats
1/2 cup sucanat or light brown sugar
1/2 tsp ground cinammon
1/4 tsp ground nutmeg
Dash of salt
2 TBSP chilled butter, cut into small pieces
Filling:
3 cups (1/2-inch) cubed peeled pear (2-3 large)
2 cups fresh cranberries
2/3 cup sucanat or light brown sugar
2 1/2 TBSP arrowroot powder or cornstarch
Remaining Ingredient:
1 unbaked 9-inch deep-dish whole wheat pie crust
1. Preheat oven to 350.
2. To prepare streusel, combine first 5 ingredients in a medium bowl; cut in butter with a pastry blender or 2 knives until mixture resembles coarse meal.
3. To prepare filling, combine pear, cranberries, 2/3 cup sucanat, and arrowroot powder in a large bowl; toss well to combine. Spoon pear mixture into pie crust; sprinkle streusel over pear mixture. Bake at 350 for 1 hour or until bubbly and streusel is browned. Cool at least 1 hour on a wire rack. Serve alone or with ice cream.
Linked to Ultimate Recipe Swap
December 1, 2010
The Deer Hunt
Warning: This post contains a graphic description of an animal being killed. Reader discretion is advised.
Ever since I learned that grass-fed meat is healthier, I've been anxious to get my hands on some. I'm also interested in eating local. So, I decided to hunt a deer on our ranch. I am not a hunter. I don't enjoy killing things. I have butchered a few animals though, so I felt confident I could do it. I dutifully purchased my game tag and paid the 'conservation tax', all of which came out to $50. $50 to shoot an animal on my own land! I enlisted the help of my brother-in-law (who does like to hunt and kill things) and his girlfriend. We piled into the old ranch pickup and headed out.
My brother-in-law, Butch, spotted a group of deer pretty quickly. The best shot I could get was still pretty far away, and I was sure it was a mama doe. I thought it would be mean to kill a mama. So we moved on. Unexpectedly, I was kind of bored! I guess since I wasn't sneaking around behind trees and crawling on my belly, I wasn't in "hunting mode". We came on another group, but they were pretty smart. They ran just out of shooting range, but we could still see them. I was ready to quit, but I wanted to get my money's worth.
Finally we spotted some on a side hill. Butch parked the pickup in the road. He and I got out and trudged through the snow towards them. Then we got on our knees so as to go unnoticed. We moved closer, stopping in some tall grass that provided a little cover for us. We were about 100 yards away from them. There were about 3 deer laying down, facing us, and a couple more standing and grazing. I chose one of the deer laying down. No antlers, and it looked a little smaller, so I figured it was a female fawn (which is what I wanted). I pulled my knee up to rest the gun on it. I concentrated on breathing steadily. I looked into the scope of the gun at the deer on the hill. I felt anxious, anticipating the innocent animal's death. I hesitated. The tag had only cost $50. Was this innocent life worth $50? Why was I doing this again? What if I miss? What if I only wound it? I pointed the gun at the deer's head, held my breath, and pulled the trigger.
It lunged forward and landed in a heap. It took the deer about 5 seconds to die, instead of 1. Butch took off running so he could slit its throat and let the blood drain out. I followed him, awkwardly running/ stomping through the snow with the gun in my hand. It was pretty unbelievable that this creature had just been alive a few minutes before. It never saw me coming. It was a male. I felt better knowing I hadn't killed someone's mother. I looked for the bullet hole. I had aimed for the head, but I had hit the lung, right behind the shoulder. The entry wound was surprisingly small. The exit wound was pretty bloody and gross. I stared at the deer, thinking I should take a picture, but finding no desire within myself to do so. Butch was excited for me. He assured me this was probably a yearling buck since it was such a good size. I felt no pride, no guilt, nothing really, which seemed strange. We each grabbed a leg, and started the long hike back to the pickup. We had to hike 1/4 mile up a hill in the snow, dragging the heavy deer. It was a very long hike. We stopped a few times to catch our breath before finally reaching the pickup. On the drive back home, Butch tried to tease me a little, but I could barely respond. My heart and lungs were still working hard from the hike, and I felt mentally tired.
My mother-in-law, Bertha, met us at the shop. We chained the deer to the tractor bucket and lifted it up off the floor. She helped me skin it and cut the meat off the bone. I was reminded once again why the food industry is in the state it is. People don't really want to do it themselves. They don't really want to know what goes into making food. It's kind of gross. At first the smell wasn't too bad, but near the end, when the guts were hanging out, I kept getting overwhelming whiffs of sage brush. Now I understand why my husband always says deer stink.
We cut out the shoulders, backstraps, tenderloin, and hind quarters. I was slightly concerned about the possiblity of Chronic Wasting Disease, which may present no obvious symptoms at first, so I was careful to leave the organs, spinal cord, and brains alone. With my knowledgeable mother-in-law, in only took about a half hour to cut the meat out. When we were finished, I finally felt pride and excitement. I had accomplished my goal, and it only took about 3 hours.
We threw the meat in my in-laws' walk-in cooler. A few days later we cut up 2 sides of pork. We ground up most of the deer meat with some pork fat and saved one backstrap intact. I also gave some meat to Butch and Bambi to make into jerky, as a way of thanking them for their help. I would guess I ended up with about 25 pounds of meat. That's a little over $2 a pound, if my time isn't worth anything.
And that was my first deer hunt!
Linked to Fight Back Friday.
Ever since I learned that grass-fed meat is healthier, I've been anxious to get my hands on some. I'm also interested in eating local. So, I decided to hunt a deer on our ranch. I am not a hunter. I don't enjoy killing things. I have butchered a few animals though, so I felt confident I could do it. I dutifully purchased my game tag and paid the 'conservation tax', all of which came out to $50. $50 to shoot an animal on my own land! I enlisted the help of my brother-in-law (who does like to hunt and kill things) and his girlfriend. We piled into the old ranch pickup and headed out.
My brother-in-law, Butch, spotted a group of deer pretty quickly. The best shot I could get was still pretty far away, and I was sure it was a mama doe. I thought it would be mean to kill a mama. So we moved on. Unexpectedly, I was kind of bored! I guess since I wasn't sneaking around behind trees and crawling on my belly, I wasn't in "hunting mode". We came on another group, but they were pretty smart. They ran just out of shooting range, but we could still see them. I was ready to quit, but I wanted to get my money's worth.
 |
| The first group we saw. Can you spot the deer? There are at least 3 in this picture. |
Finally we spotted some on a side hill. Butch parked the pickup in the road. He and I got out and trudged through the snow towards them. Then we got on our knees so as to go unnoticed. We moved closer, stopping in some tall grass that provided a little cover for us. We were about 100 yards away from them. There were about 3 deer laying down, facing us, and a couple more standing and grazing. I chose one of the deer laying down. No antlers, and it looked a little smaller, so I figured it was a female fawn (which is what I wanted). I pulled my knee up to rest the gun on it. I concentrated on breathing steadily. I looked into the scope of the gun at the deer on the hill. I felt anxious, anticipating the innocent animal's death. I hesitated. The tag had only cost $50. Was this innocent life worth $50? Why was I doing this again? What if I miss? What if I only wound it? I pointed the gun at the deer's head, held my breath, and pulled the trigger.
It lunged forward and landed in a heap. It took the deer about 5 seconds to die, instead of 1. Butch took off running so he could slit its throat and let the blood drain out. I followed him, awkwardly running/ stomping through the snow with the gun in my hand. It was pretty unbelievable that this creature had just been alive a few minutes before. It never saw me coming. It was a male. I felt better knowing I hadn't killed someone's mother. I looked for the bullet hole. I had aimed for the head, but I had hit the lung, right behind the shoulder. The entry wound was surprisingly small. The exit wound was pretty bloody and gross. I stared at the deer, thinking I should take a picture, but finding no desire within myself to do so. Butch was excited for me. He assured me this was probably a yearling buck since it was such a good size. I felt no pride, no guilt, nothing really, which seemed strange. We each grabbed a leg, and started the long hike back to the pickup. We had to hike 1/4 mile up a hill in the snow, dragging the heavy deer. It was a very long hike. We stopped a few times to catch our breath before finally reaching the pickup. On the drive back home, Butch tried to tease me a little, but I could barely respond. My heart and lungs were still working hard from the hike, and I felt mentally tired.
My mother-in-law, Bertha, met us at the shop. We chained the deer to the tractor bucket and lifted it up off the floor. She helped me skin it and cut the meat off the bone. I was reminded once again why the food industry is in the state it is. People don't really want to do it themselves. They don't really want to know what goes into making food. It's kind of gross. At first the smell wasn't too bad, but near the end, when the guts were hanging out, I kept getting overwhelming whiffs of sage brush. Now I understand why my husband always says deer stink.
 |
| That's me, in the least graphic picture of the butchering process. |
We threw the meat in my in-laws' walk-in cooler. A few days later we cut up 2 sides of pork. We ground up most of the deer meat with some pork fat and saved one backstrap intact. I also gave some meat to Butch and Bambi to make into jerky, as a way of thanking them for their help. I would guess I ended up with about 25 pounds of meat. That's a little over $2 a pound, if my time isn't worth anything.
And that was my first deer hunt!
 |
| The finished product (minus the jerky meat) |
Linked to Fight Back Friday.
November 29, 2010
Potato Patties
Here is a great way to use up those leftover mashed potatoes. These potato patties are a savory alternative to the traditional flour-based pancake. I cook mine in bacon grease, but butter or beef tallow would work well too. Serve with a few pieces of bacon and a gently fried egg.

Potato Patties:
makes 2-3 potato patties
1 to 1 1/2 cups cold leftover mashed potatoes
1 egg
milk (optional)
grease for cooking
salt and pepper to taste
Directions:
Mix potatoes and egg. Add enough milk until mixture has a slightly runny consistency. Drop by 1/2 cup-fulls onto hot greased pan (350 degrees on my nonstick griddle). Sprinkle with salt and pepper if desired. Cook about 10 minutes or until golden brown. Flip, and continue cooking until both sides are golden brown. Serve with bacon and eggs.
Linked to Tempt My Tummy Tuesday and Tasty Tuesday.
November 15, 2010
Black Bean Cassoulet
I promised to post this, so here it is. According to Dictionary.com, cassoulet is "a white-bean stew of french origin, often containing pork, mutton, garlic sausage, and preserved goose or duck". I used black beans, chicken, and beef sausage. Feel free to add more vegetables and herbs if your family tolerates them. It's a cozy, protein-packed meal for a cold winter's day.
Start by browning some chicken legs in some olive oil.

Cut up some onions, carrots, and garlic (not too much if you have a picky husband!)

Slice some cooked beef sausage.

Throw it all in the pot.

Throw in a can of black beans and pour some chicken broth over all.

Cover and bake at 250 for a couple of hours. If it's too watery for you, bring it to a boil on the stove and boil until the liquid is reduced to your liking. Serve over rice or bread if desired.
Of course I forgot to get a picture of the finished product. I was too hungry!
Black Bean Cassoulet
(serves 2 grown ups and a toddler)
Ingredients:
2 TBSP extra-virgin olive oil
2 chicken legs
2 chicken legs
salt and pepper
some baby carrots
2 TBSP finely chopped onion
1 clove garlic, minced
5 oz fully cooked beef sausage, sliced
1 can (14.5 oz) black beans, drained and rinsed
1 cup chicken stock
Directions:
1. Heat oil in medium oven-safe pot over medium heat. Season chicken with salt and pepper.
2. Brown chicken on both sides.
3. Add vegetables to pot. Saute 2 minutes.
4. Add sliced sausage. Saute 2 minutes.
5. Add stock and beans. Stir well.
6. Cover and bake for 2-3 hours at 250.
7. Remove from oven. If cassoulet is too watery, bring to a boil on stove and cook until liquid is reduced to your liking.
8. Season to taste and enjoy!
November 8, 2010
Roasted Butternut Squash Soup
This is my all-time favorite soup. It is another great recipe from Cook's Country (that magazine is the best)! This soup is full of Real Food ingredients. So delicious and hearty. I like to double it and freeze some, although the roasting pan gets kind of crowded when I do that.
*I don't add the heavy cream and I don't add extra water at the end , but those steps are in the original recipe.
Roasted Butternut Squash Soup
First you peel your butternut squash. I found laying it on its side worked well.

Scrape seeds and pulp out of the squash.

Cut squash into 1 1/2" chunks and spread them on your roasting pan.

Grab some shallots.

Peel the shallots and toss them onto the pan too.


Roast at 425 for about 45 minutes.

Pour some chicken broth on the vegetables. Throw them back in the oven for 5 minutes.
 Put vegetables and remaining broth in saucepan.

Puree with an immersion blender. Add maple syrup, nutmeg, and cider vinegar.

Seaon with salt and pepper to taste. Enjoy!

Roasted Butternut Squash Soup- from Cook's Country magazine
serves 4
Ingredients:
1 medium butternut squash (about 3 pounds), peeled, seeded, and cut into 1 1/2 inch chunks
2 medium shallots, peeled and quartered
1/4 cup olive oil
salt and pepper
4 cups chicken broth (use low-sodium if you're using store-bought)
1 TBSP maple syrup
1 tsp cider vinegar
1/8 tsp ground nutmeg
1/4 cup heavy cream (optional)
Directions:
1. Adjust oven rack to middle position and heat oven to 425. Toss squash, shallots, oil, salt, and pepper on a large roasting pan. Arrange in a single layer. Roast, stirring occasionally (this is important!) until vegetables are golden brown and softened, about 45 minutes. Add 1/2 cup broth to pan and stir. Return to oven and cook until liquid has reduced and vegetables are glazed, about 5 minutes.
2. Puree squash and remaining broth (I like to use an immersion blender right in my saucepan). Stir in syrup, vinegar, nutmeg, and cream (if using). Bring soup to simmer over medium-low heat, adding 1/4 cup water at a time as necessary to adjust consistency. Serve.
Linked to Tasty Tuesday and Tempt My Tummy Tuesday.
*I don't add the heavy cream and I don't add extra water at the end , but those steps are in the original recipe.
Roasted Butternut Squash Soup
First you peel your butternut squash. I found laying it on its side worked well.

Scrape seeds and pulp out of the squash.

Cut squash into 1 1/2" chunks and spread them on your roasting pan.

Grab some shallots.

Peel the shallots and toss them onto the pan too.

Drizzle with oil, and sprinkle with salt and pepper. Toss to coat.

Roast at 425 for about 45 minutes.

Pour some chicken broth on the vegetables. Throw them back in the oven for 5 minutes.


Puree with an immersion blender. Add maple syrup, nutmeg, and cider vinegar.

Seaon with salt and pepper to taste. Enjoy!

Roasted Butternut Squash Soup- from Cook's Country magazine
serves 4
Ingredients:
1 medium butternut squash (about 3 pounds), peeled, seeded, and cut into 1 1/2 inch chunks
2 medium shallots, peeled and quartered
1/4 cup olive oil
salt and pepper
4 cups chicken broth (use low-sodium if you're using store-bought)
1 TBSP maple syrup
1 tsp cider vinegar
1/8 tsp ground nutmeg
1/4 cup heavy cream (optional)
Directions:
1. Adjust oven rack to middle position and heat oven to 425. Toss squash, shallots, oil, salt, and pepper on a large roasting pan. Arrange in a single layer. Roast, stirring occasionally (this is important!) until vegetables are golden brown and softened, about 45 minutes. Add 1/2 cup broth to pan and stir. Return to oven and cook until liquid has reduced and vegetables are glazed, about 5 minutes.
2. Puree squash and remaining broth (I like to use an immersion blender right in my saucepan). Stir in syrup, vinegar, nutmeg, and cream (if using). Bring soup to simmer over medium-low heat, adding 1/4 cup water at a time as necessary to adjust consistency. Serve.
Linked to Tasty Tuesday and Tempt My Tummy Tuesday.
November 3, 2010
Rendering Tallow and Homemade Potato Chips
A few days ago I tried rendering beef tallow for the first time, to fry up some potato chips. Can I just say, they were out of this world amazing? And I'm not a potato gal. Beef tallow is the fat MacDonald's used to use for their french fries, back before everyone thought animal fats were bad. Folks who've read Nourishing Traditions know that's not always the case.
I found my tallow in the in-laws' deep freeze. Lucky for me, they had saved it the last time we butchered a cow (I'll write a post about that in the future, if you can stomach it). I don't really know where to purchase tallow, except straight from the farmer (that would be rancher, in our case).
Here's how you render beef tallow (or lard).
You cut it into small-ish chunks (1 1/2" to 2"). Then you put it in a pan and cook it on low, covered, for a couple of hours. I stirred mine every once in a while. Here it is after about an hour:

After a couple of hours, it is ready to be strained.

Once you strain it through a colander, it looks like this:

Looks just like vegetable oil!
It will return to a solid state once it's cooled. I suggest storing it in the fridge.
To make potato chips, use a mandolin or a good knife and a steady hand to slice some potatoes really thin. I used red potatoes to make these, because that's what I had:

Put enough tallow in your pan to reach a depth of 2". Heat your tallow on medium high. Drop a small slice of potato in the fat. If the fat is hot enough, the potato will start bubbling and rise to the surface.
When the fat is hot enough, drop a handful of potato slices into the fat. Don't crowd them. Cook about 3-5 minutes per side. Try not to overcook them.
Drain on a paper-towel lined plate. Sprinkle with salt and serve immediately. I didn't get a picture of the chips because they were gone too quickly! Delicious!
You can also re-use the tallow to fry another batch of potato chips. I would guess the tallow would keep about a week in the fridge (probably longer, but I really don't know).
November 2, 2010
Big's Macaroni and Cheese
I always get nostalgic in the fall (who doesn't?) and I start missing the food from my childhood. This is my grandfather's recipe. He and my grandmother moved in with us when I was 8. I have lots of fond memories of them. I called both my grandfather and my grandmother "Paw Paw" until I was about 3. My grandfather was 6'1", and my grandmother is about 5'1". So I started calling him "Big Paw Paw" and her "Lit Paw Paw" (Lit as in little). I'm not sure why I've always spelled it "paw paw", but I know I've done that since I could read and write. As we grew older, my brother started shortening their names to just "Big" and "Lit". Big died in 1997, but Lit is 89 years old.
 Since I only make it about once a year, I just use the white pasta, but you could surely use whole wheat. This tastes best when you let it sit a few minutes after baking. It's also great cold.
 Big's Macaroni and Cheese
Ingredients:
1/2 lb elbow macaroni (uncooked)
2 cloves garlic, peeled, still whole
1 lb cheese (I love extra sharp cheddar), cut into 1/2" chunks
1 egg
1 cup milk
salt and pepper
shredded cheese for toppingDirections:
1. Cook noodles with whole garlic cloves in boiling water until al dente. Drain, discard garlic.
2. Grease an oven-safe glass bowl (or other deep casserole). Layer noodles with cheese chunks, finishing with noodles.
3. Combine milk, egg, salt and pepper. Pour over noodles, filling all spaces. Top with shredded cheese.
4. Bake at 350 degreese until brown and bubbly (at least 30 minutes).
5. If you want a crust on top, preheat broiler. Broil 2-3 minutes, or until browned. (I love the crust!)
Oh man, just typing this post makes my mouth water!
Visit Tempt My Tummy Tuesday for more great recipes.
November 1, 2010
Gratituesday- Honey
I am so excited about this honey. My neighbor gave it to me. A bee company put some hives on her land this summer, and they gave her a 5 gallon bucket of honey in return. She is keeping it in her basement, thinking it will last longer. She had to cut it out of the bucket with a knife.

This is the weirdest honey I've ever seen.

Oops, you can see my reflection on the spoon! This is the jar that was still pretty cold, and thus, hard.

I had set the other jar in my garage, which is apparently warmer than my kitchen.


This is the weirdest honey I've ever seen.

Oops, you can see my reflection on the spoon! This is the jar that was still pretty cold, and thus, hard.

I had set the other jar in my garage, which is apparently warmer than my kitchen.

It tastes delicious too. I've already used some to make granola bars. Can't wait to try it in my Honey Wheat Bread.
Join us for Gratituesday at Heavenly Homemakers!
October 29, 2010
BBQ Chicken Pizza
This is a quick meal for a busy night. It is on the table in 45 minutes or less. Most of that time is in the oven, so you have time to get out plates, fill drinking cups, and cut up some fruit or veggies to go on the side. If you are really pressed for time in the evenings, you can make the dough earlier in the day and refrigerate it, covered, until you're ready to bake it. Keep some cooked chicken in your freezer and you can whip this up in no time! I never measure the toppings. I just keep adding stuff until it looks right (although I did measure them tonight to give you an idea of how much you need).


For crust:
1 (.25 ounce) package active dry yeast
1 teaspoon white sugar
1 cup warm water (110 degrees F/45 degrees C)
1 1/2 cups bread flour
1 cup whole wheat flour
2 tablespoons olive oil
1 teaspoon sea salt
cornmeal (optional)
Toppings:
3/4 cup BBQ sauce
1 1/2 cups cooked, chopped chicken
1 cup tightly packed fresh spinach leaves
2 cups shredded mozzarella cheese
Directions
1. Preheat oven to 400 degrees. In medium bowl, dissolve yeast and sugar in warm water. Let stand until creamy, about 10 minutes.
2. Stir in flours, salt, and oil. Knead until smooth. Let rest for 5 minutes. Clean off your countertop. Put some foil on your pizza pan and dust it with cornmeal or olive oil.
3. Turn dough out onto a lightly floured surface (your clean countertop works great) and pat or roll into a round. Transfer crust to pizza pan.
4. Bake in preheated oven 10 minutes. Assemble your toppings while it's baking.
5. Top with sauce, cheese, chicken, and spinach. Bake 12 minutes longer. Let baked pizza cool for 5 minutes before serving.
October 25, 2010
Runsas!
I really enjoyed these beef, cheese, and cabbage-filled buns. I was surprised how mild the cabbage tasted. I think they would freeze well. They are great with ketchup and spicy mustard. You could also cook the filling the day before assembling these, like I did.

Runsas (makes 8)
Adapted from Cook's Country, April/May 2007 (p. 7)
Dough
3/4 cup warm water (110 degrees)
1/2 cup sweetened condensed milk
1/4 cup melted butter
2 TBSP sugar
1 large egg
1 1/2 cups whole wheat flour
2 cups unbleached all-purpose flour, plus extra for rolling out dough
1 TBSP plus 1 tsp yeast
1 tsp salt
Filling
1 1/2 pounds ground beef
3 TBSP finely minced onion
3 cups chopped cabbage
salt and pepper
2 cups shredded Colby Jack cheese
1. Combine dry ingredients in large bowl. Make well in center of dry ingredients, add wet ingredients, and mix until shaggy dough forms. Turn dough out onto heavily floured work surface and knead until smooth and elastic, about 10 minutes. Place in large, greased bowl. Cover bowl with plastic wrap or dish towel and let rest in warm place until doubled in size (anywhere from 1 to 3 hours).
2. Brown beef in large skillet. Add onion and cabbage and cook until cabbage is slightly wilted, about 5 minutes. Season with salt and pepper.
3. Adjust oven racks to the upper-middle and lower-middle positions and heat oven to 350 degrees. Line two baking sheets with aluminum foil. Divide dough into 8 equal pieces. Working on lightly floured work surface, roll each piece of dough into 7-inch circle. Place one dough round in deep cereal bowl and top with 1/4 cup cheese. Spoon 3/4 cup filling over cheese and pinch edges of dough together to form bun. Transfer bun, seam side down, to prepared baking sheet. Repeat with remaining dough, cheese, and filling, placing 4 buns on each baking sheet. Cover buns with plastic wrap and let rise until puffed, about 20 minutes.
4. Bake buns until golden brown, about 20 minutes, switching and rotating positions of baking sheets halfway through baking time. Brush buns with melted butter and serve.
3. Adjust oven racks to the upper-middle and lower-middle positions and heat oven to 350 degrees. Line two baking sheets with aluminum foil. Divide dough into 8 equal pieces. Working on lightly floured work surface, roll each piece of dough into 7-inch circle. Place one dough round in deep cereal bowl and top with 1/4 cup cheese. Spoon 3/4 cup filling over cheese and pinch edges of dough together to form bun. Transfer bun, seam side down, to prepared baking sheet. Repeat with remaining dough, cheese, and filling, placing 4 buns on each baking sheet. Cover buns with plastic wrap and let rise until puffed, about 20 minutes.
4. Bake buns until golden brown, about 20 minutes, switching and rotating positions of baking sheets halfway through baking time. Brush buns with melted butter and serve.
Linked to Tempt My Tummy Tuesday
October 24, 2010
Weekly Meal Plan 10/24- 10/30
This week the goal is to get rid of some random foods that need to be used up, so that's why some of the menus for the week might look a little strange. I still have a quarter head of cabbage leftover after making Cabbage Casserole and Runsas, so I'm going to make some Roasted Cabbage Wedges. If they turn out well, I'll post the recipe. I found some artichokes in the in-laws' cooler, at least a week old, which I'll steam and serve with butter. My husband is so not a vegetable eater, and he loves these. It's a great way to get kids to eat some veggies too. I also found some beef fat in the in-laws' deep freeze, which I'll use to make fried potatoes. Yummmm. I guess I am kind of spoiled, having that extra deep freeze and cooler that I can ransack from time to time.
Wednesday, 10/27- cheesy beef and rice (new recipe), fresh fruit
Thursday, 10/28- steaks, potatoes fried in beef tallow, steamed artichokes
Friday, 10/29- Baked Salmon Fillet, Sauteed Broccoli, Honey Wheat Bread
Saturday, 10/30- leftovers
Be sure to visit I'm an Organizing Junkie for more meal plans.
The days are quickly growing shorter. I guess fall really is here.

Sunday, 10/24- Beef and Vegetable Soup
Monday, 10/25- slow cooker fajitas, roasted cabbage wedges (new recipe)
Tuesday, 10/26- hamburger gravy, mashed potatoes, spinachWednesday, 10/27- cheesy beef and rice (new recipe), fresh fruit
Thursday, 10/28- steaks, potatoes fried in beef tallow, steamed artichokes
Friday, 10/29- Baked Salmon Fillet, Sauteed Broccoli, Honey Wheat Bread
Saturday, 10/30- leftovers
Be sure to visit I'm an Organizing Junkie for more meal plans.
The days are quickly growing shorter. I guess fall really is here.

October 19, 2010
Roasted Pumpkin Seeds
A few days ago I roasted some pumpkin seeds for the first time. Pumpkin seeds are supposed to be a very healthy snack. They were pretty tasty, although next time I might try seasoned salt. I am proud to say I used a pumpkin from my garden (instead of letting it get really really old and too far gone to use and then just giving it to the chickens, which I have done maybe once... okay, alot). I also roasted the pumpkin halves and froze the flesh to use in bread or pie! Yum!
First I cut the pumpkin in half.
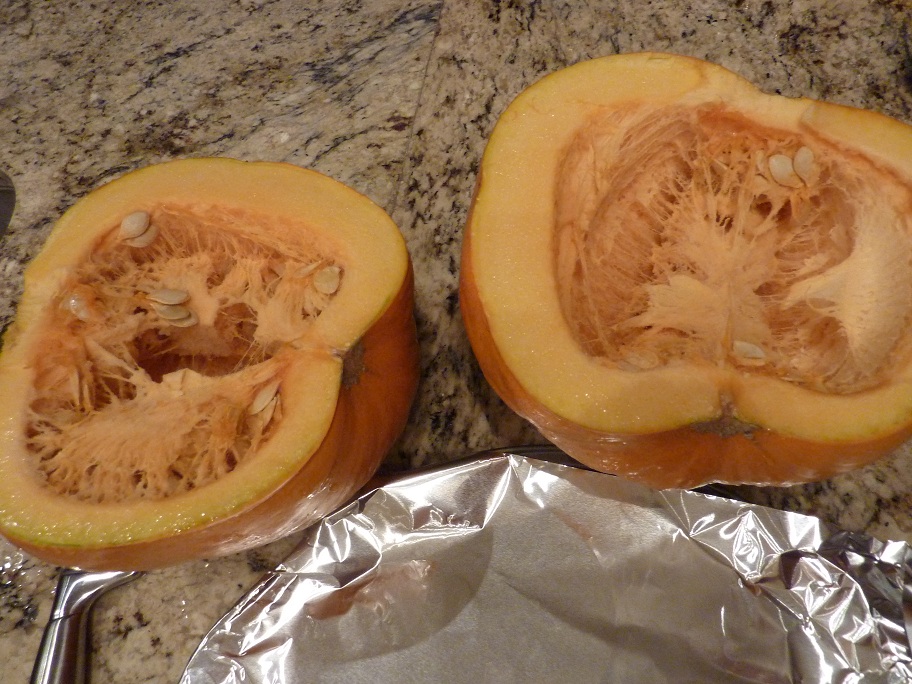
Then I scooped out the seeds.

First rinse. I manually separated the pulp from the seeds.

Laid them on a kitchen towel to dry. Picked out remaining pulp.

Second rinse.

Laid them on another towel to dry overnight. Went to sleep.

In the morning, I put the seeds on a baking sheet. While making breakfast, I drizzled some butter and sprinkled some salt on the seeds.

I stirred the seeds with my handy spatula.

I baked them at 300 for about 45 minutes. Stirred them again. Baked another 5 minutes.
Here is the final product:

My husband and I ate these in a day.
Roasted Pumpkin Seeds:
Ingredients:
1 pumpkin
a couple teaspoons melted butter
a few pinches of salt
Directions:
1) Cut pumpkin in half. Scoop out seeds into a colander.
2) Rinse seeds. Pick out pulp and discard.
3) Turn seeds out onto dish towel. Pick out remaining pulp.
4) Rinse second time.
5) Turn seeds out onto clean dish towel. Let dry 8 to 24 hours.
6) Spread seeds on baking sheet.
7) Drizzle with butter and sprinkle with salt. Stir.
8) Spread seeds into single layer.
9) Bake at 300 for 45-55 minutes, stirring once.
10) Store in airtight container.
Linked to Tasty Tuesday
Subscribe to:
Posts (Atom)